In today’s tutorial, I will use the plugin Featured Image with URL as an example to create an endpoint that can be called by the frontend.
The native WordPress Featured Image requires images to be uploaded to the site’s own server. When called on the frontend, this consumes server bandwidth and traffic, which can be a serious burden for hosts with limited resources. This is why the Featured Image with URL plugin exists. It allows you to set an image hosted on a remote image service as the featured image of a post. However, when calling the REST API on the frontend, this image URL is not included by default in the REST API output data.
Therefore, we can add the remote featured image URL provided by Featured Image with URL for each post into the REST API output and make it available for frontend usage.
1. Identify the Data Field Name Generated by the Plugin
First, we need to determine which database table stores the image URL added by the Featured Image with URL plugin and under which field name. To do this, log in to phpMyAdmin, enter your database, navigate to the wp_postmeta table, and check whether the meta_value column contains image URLs. The image below shows an example:
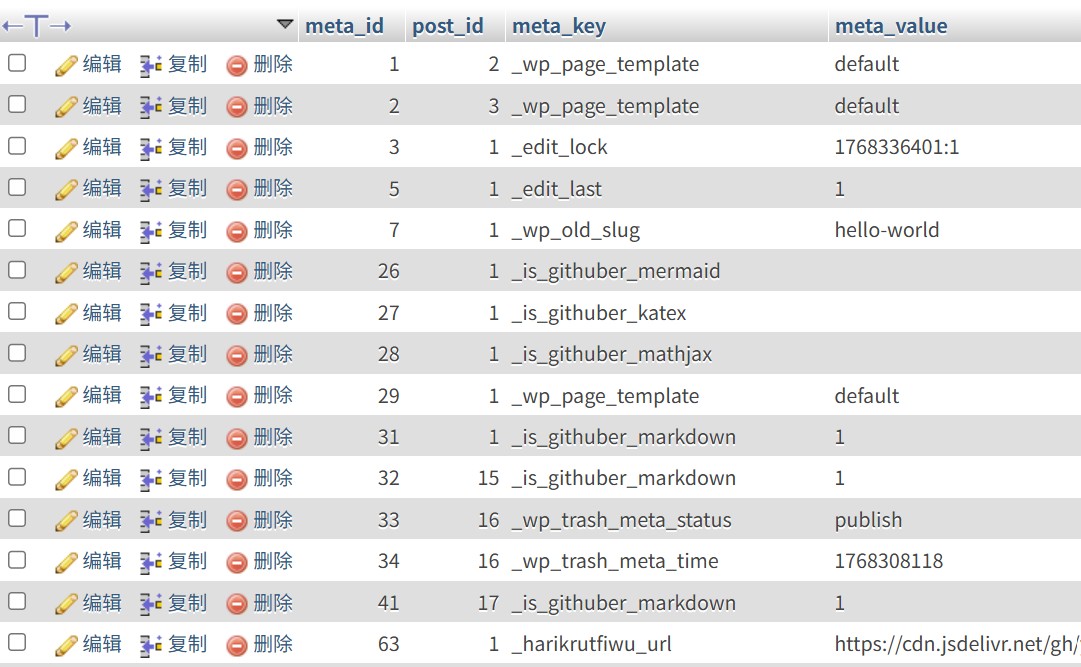
As you can see, the data we need is on row 63. Its meta_key is _harikrutfiwu_url. Remember this key.
2. Register the Field in the REST API
Next, go to the directory of the currently active WordPress theme. Open the functions.php file with an editor and register this meta_key at the end of the file so that it is exposed in the REST API. The complete code is as follows:
// Custom REST API for posts
function register_custom_rest_field() {
register_rest_field('post', 'harikrutfiwu_url', array(
'get_callback' => function($post_arr) {
return get_post_meta($post_arr['id'], '_harikrutfiwu_url', true);
},
'update_callback' => function($value, $post) {
if (current_user_can('edit_post', $post->ID)) {
update_post_meta($post->ID, '_harikrutfiwu_url', $value);
}
},
'schema' => array(
'type' => 'string',
'format' => 'uri',
),
));
}
add_action('rest_api_init', 'register_custom_rest_field');

// Custom REST API for pages
function register_page_custom_rest_field() {
register_rest_field('page', 'harikrutfiwu_url', array(
'get_callback' => function($post_arr) {
return get_post_meta($post_arr['id'], '_harikrutfiwu_url', true);
},
'update_callback' => function($value, $post) {
if (current_user_can('edit_post', $post->ID)) {
update_post_meta($post->ID, '_harikrutfiwu_url', $value);
}
},
'schema' => array(
'type' => 'string',
'format' => 'uri',
),
));
}
add_action('rest_api_init', 'register_page_custom_rest_field');
After adding the code, save the updated functions.php file to the server.
3. Verify That the Field Is Successfully Output via the REST API
Now open the native WordPress REST API:
https://www.yourdomian.com/wp-json/wp/v2/posts
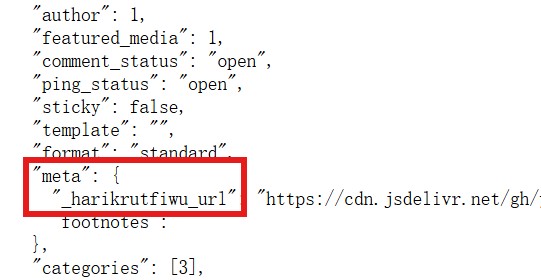
You should see the value of _harikrutfiwu_url included in the output JSON data.
In the next article, I will explain how to read and use this data on the frontend.